Overview
This guide walks you through the full lifecycle of the Zoom Contact Center integration with the OpenMethods Experience Platform: adding the app in Zoom Marketplace, authorizing it in OpenMethods, using it for OpenConnect event delivery, updating the configuration when needed, and removing it cleanly when you are done. The integration uses Zoom's General App type with webhook-based event notifications to deliver real-time contact center events to PopFlow workflows.
Prerequisites
- A Zoom account with Admin privileges
- Access to the Zoom Marketplace
- Access to the OpenMethods Experience Designer (Configuration → OpenConnect)
- Access to the OpenMethods Integrations page
-
Your webhook URL (e.g.
https://connect.openmethodscloud.com/webhook/zoom) - Your Customer ID from the OpenMethods platform
Part 1 — Build a Zoom App
Open Zoom Marketplace
Log in to the Zoom Marketplace. Click the Develop dropdown in the top navigation and select Build App.
Create a General App
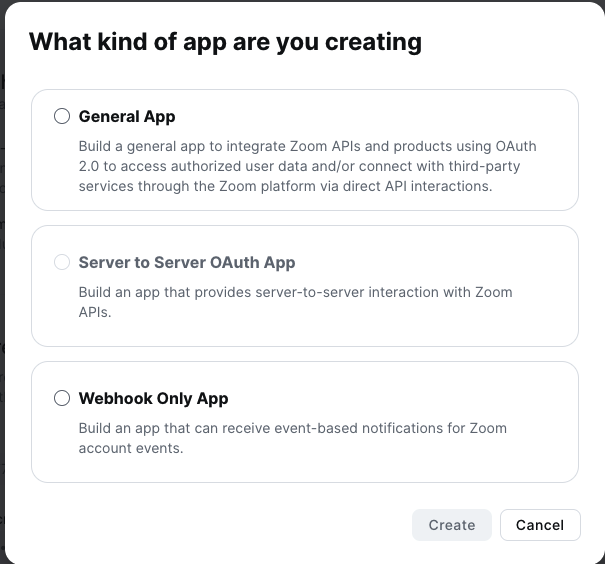
From the list of app types, select General App and click Create. This is the required app type for Contact Center event integration.
Step 2 — Basic Information
App Management
Under "Select how the app is managed", choose Admin-managed, then click Save.
App Credentials
After saving, the Client ID and Client Secret will be displayed. Copy both values — you will use them when configuring the Zoom Integration in the OpenMethods Experience Platform.
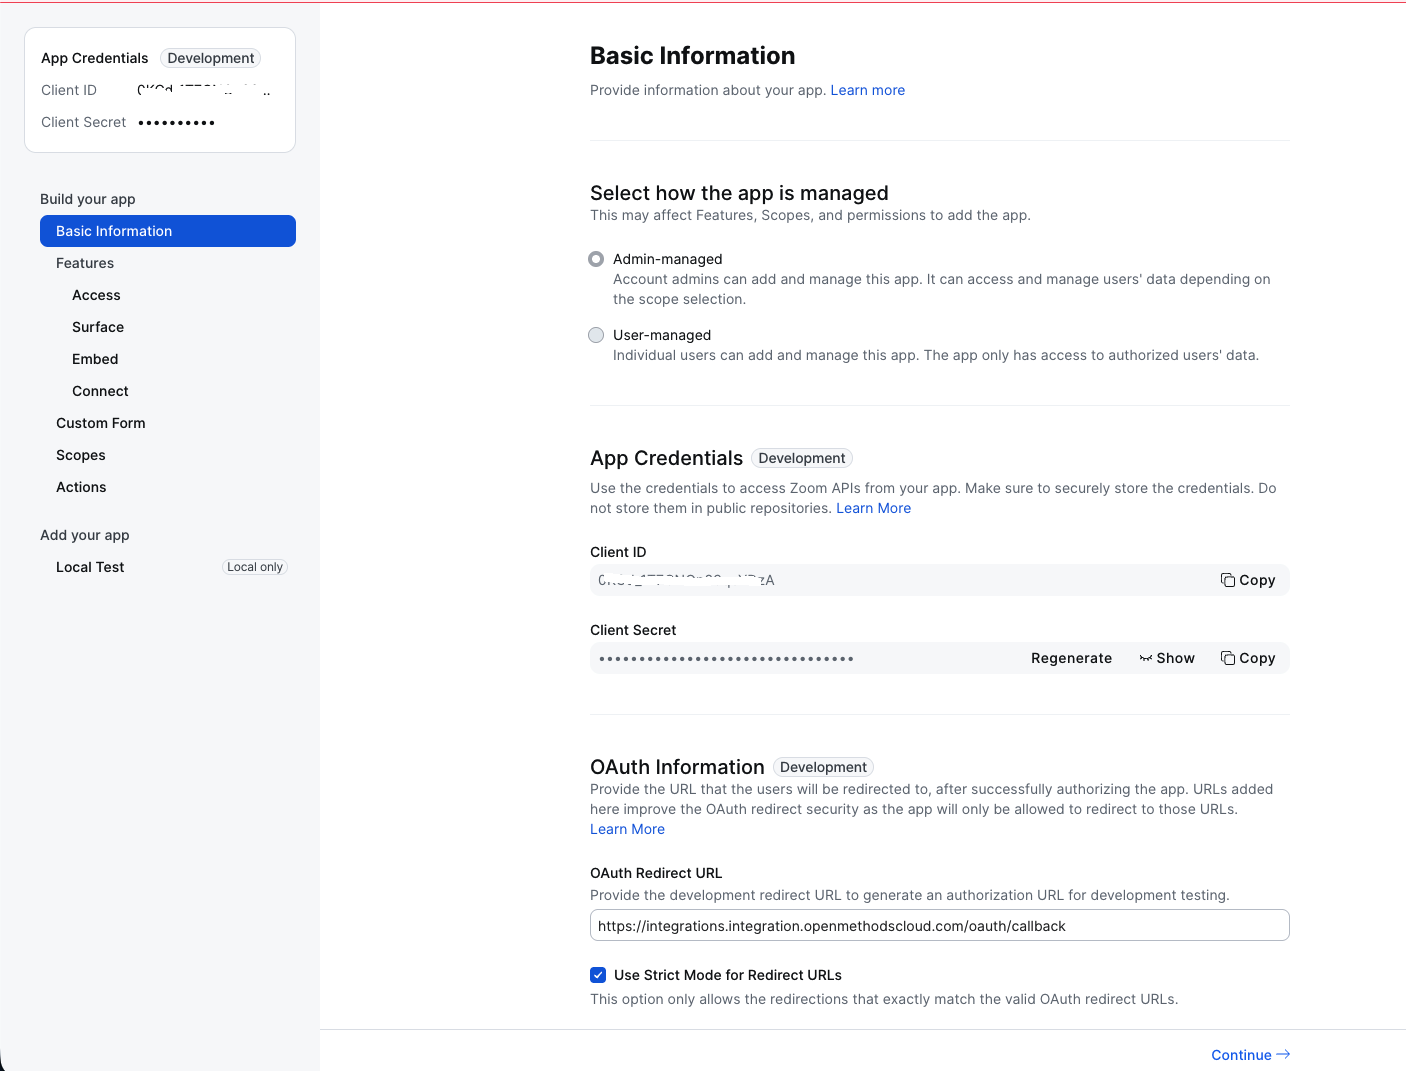
Store the Client ID and Client Secret securely. You'll need them in Part 2 — Add Zoom Integration.
| Field | Where It's Used |
|---|---|
| Client ID | Zoom Integration configuration in OpenMethods |
| Client Secret | Zoom Integration configuration in OpenMethods |
Step 2b — OAuth Configuration
In the OAuth section of your Zoom app, configure the following:
-
OAuth Redirect URL — Enter the OpenMethods callback URL:
https://integrations.openmethodscloud.com/oauth/callback
- Strict Mode — Enable Use Strict Mode for Redirect URLs.
- Click Continue → to proceed.
The redirect URL must match exactly. Using strict mode ensures the OAuth flow only accepts the specified URL, preventing redirect attacks.
Step 3 — Secret Token (Feature > Access)
Navigate to Feature → Access in your Zoom app settings. Copy the Secret Token displayed on this page.
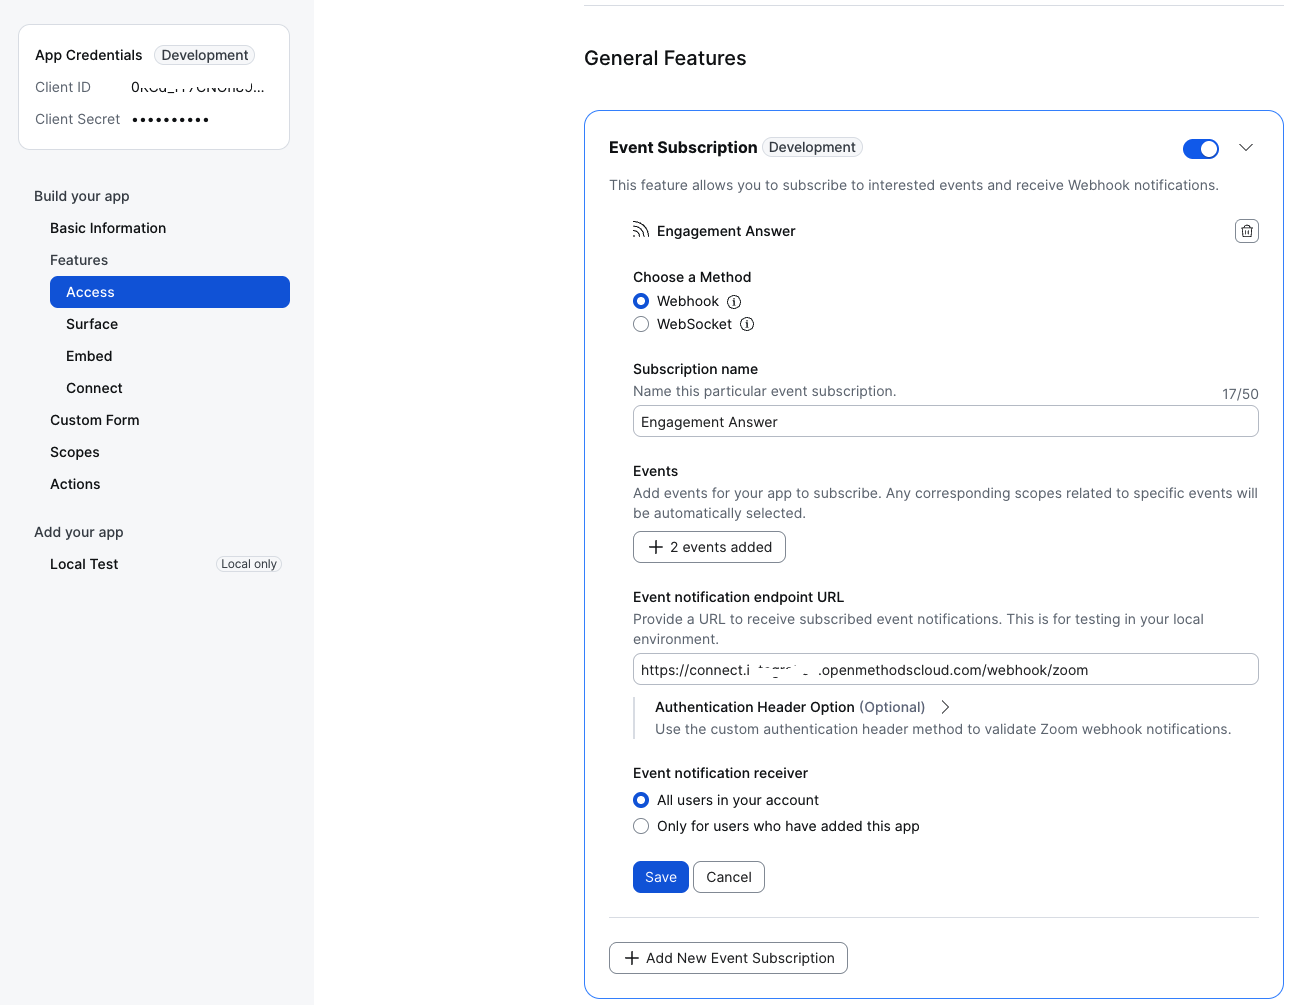
You will need this Secret Token when configuring the webhook in OpenConnect (Part 3). It is used to verify that incoming webhook events are genuinely from Zoom.
| Field | Where It's Used |
|---|---|
| Secret Token | OpenConnect → Zoom Contact Center → Secret Token field |
Step 4 — Event Subscription (General Feature)
In General Features, enable the Event Subscription toggle, then click + Add New Event Subscription.
Subscription Method
Select Webhook as the delivery method.
Subscription Name
Enter a descriptive name, for example: Engagement Events.
Add Events
- Click + Add Events
- Search for "Engagement" — Select the engagement events shown. Standard events include engagement start, end, and status changes.
- Click Done to confirm the selection.
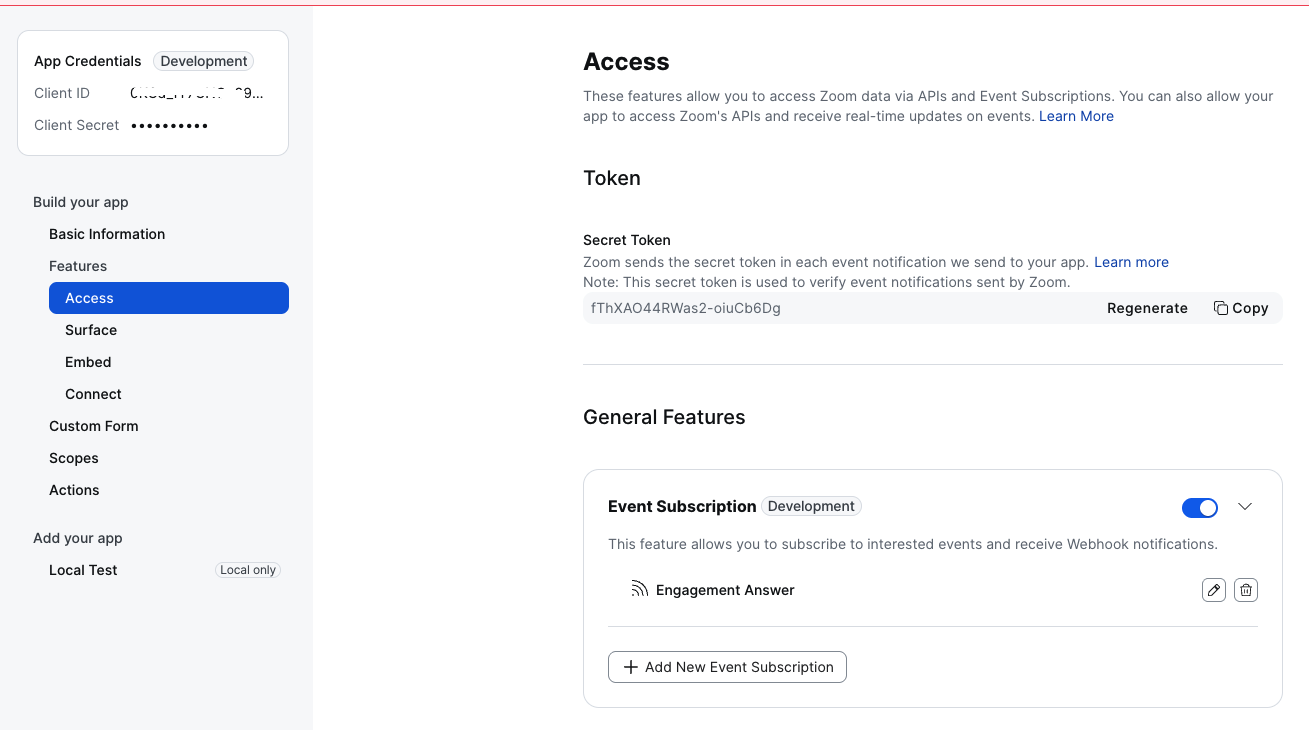
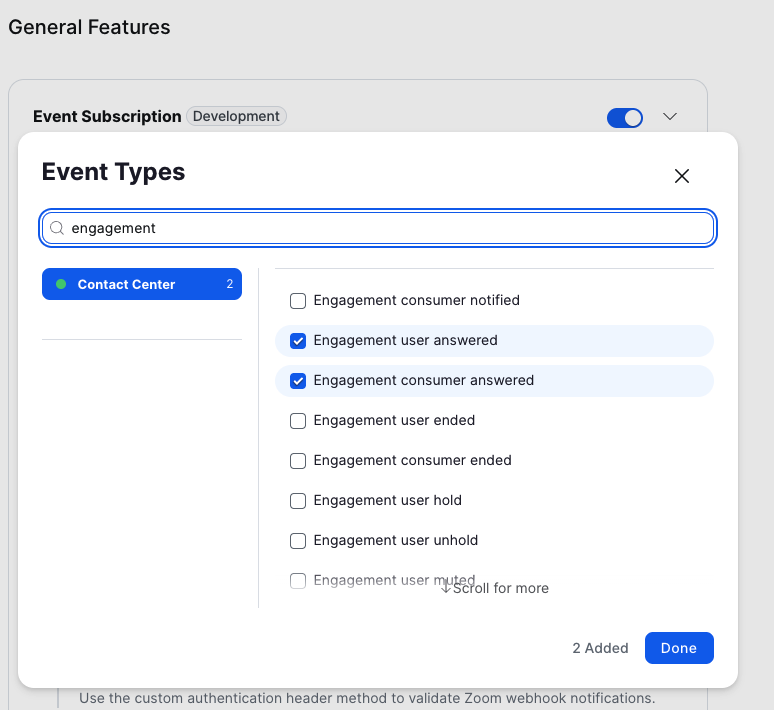
You may also select additional events beyond the standard engagement events. Any non-standard events will be handled as Custom events within PopFlow workflows.
Event Notification Endpoint URL
Enter your webhook URL:
https://connect.openmethodscloud.com/webhook/zoom
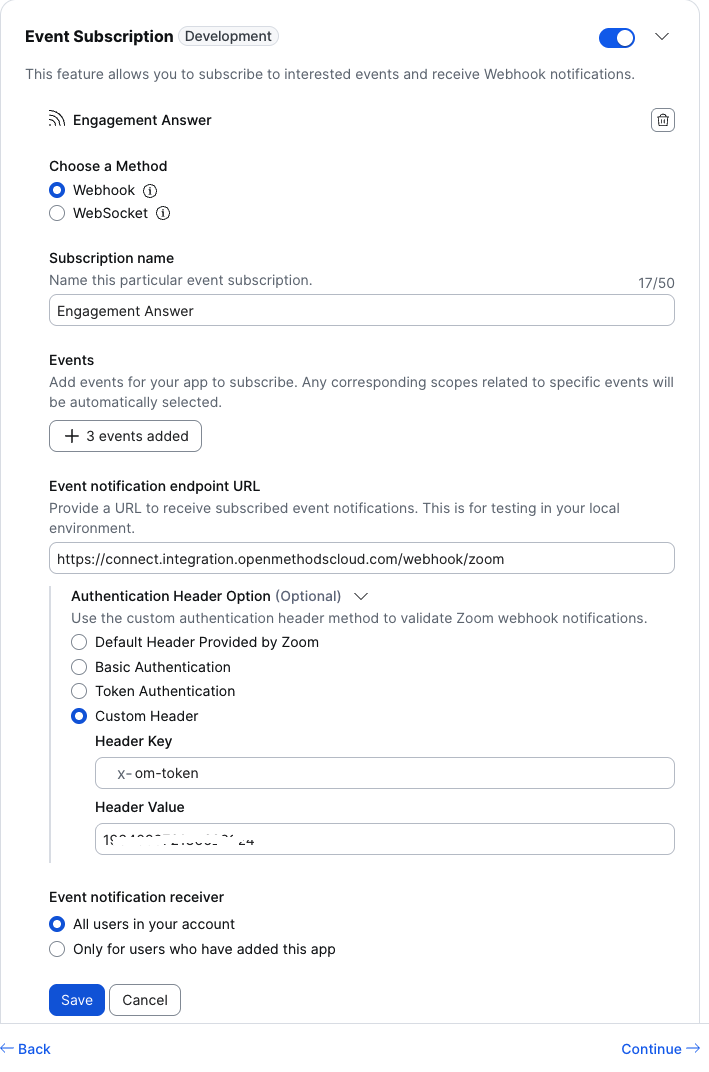
Authentication Header
Select Custom Header and configure:
| Setting | Value |
|---|---|
| Header Key | x-om-token |
| Header Value | <Your Customer ID> |
Event Notification Receiver
Select All users in your account.
Click Save, then click Continue.
Step 5 — Surface
Under "Select where to use your app", choose Contact Center, then click Continue →.
You do not need to add anything under Embed, Connect, or Custom Form. Proceed directly to the Scopes section.
Step 6 — Add Scopes
When you selected the Engagement events in Step 4, the required scope was added automatically:
contact_center:read:engagement:admin
Copy this scope — you will paste it into the Zoom Integration configuration in OpenMethods.
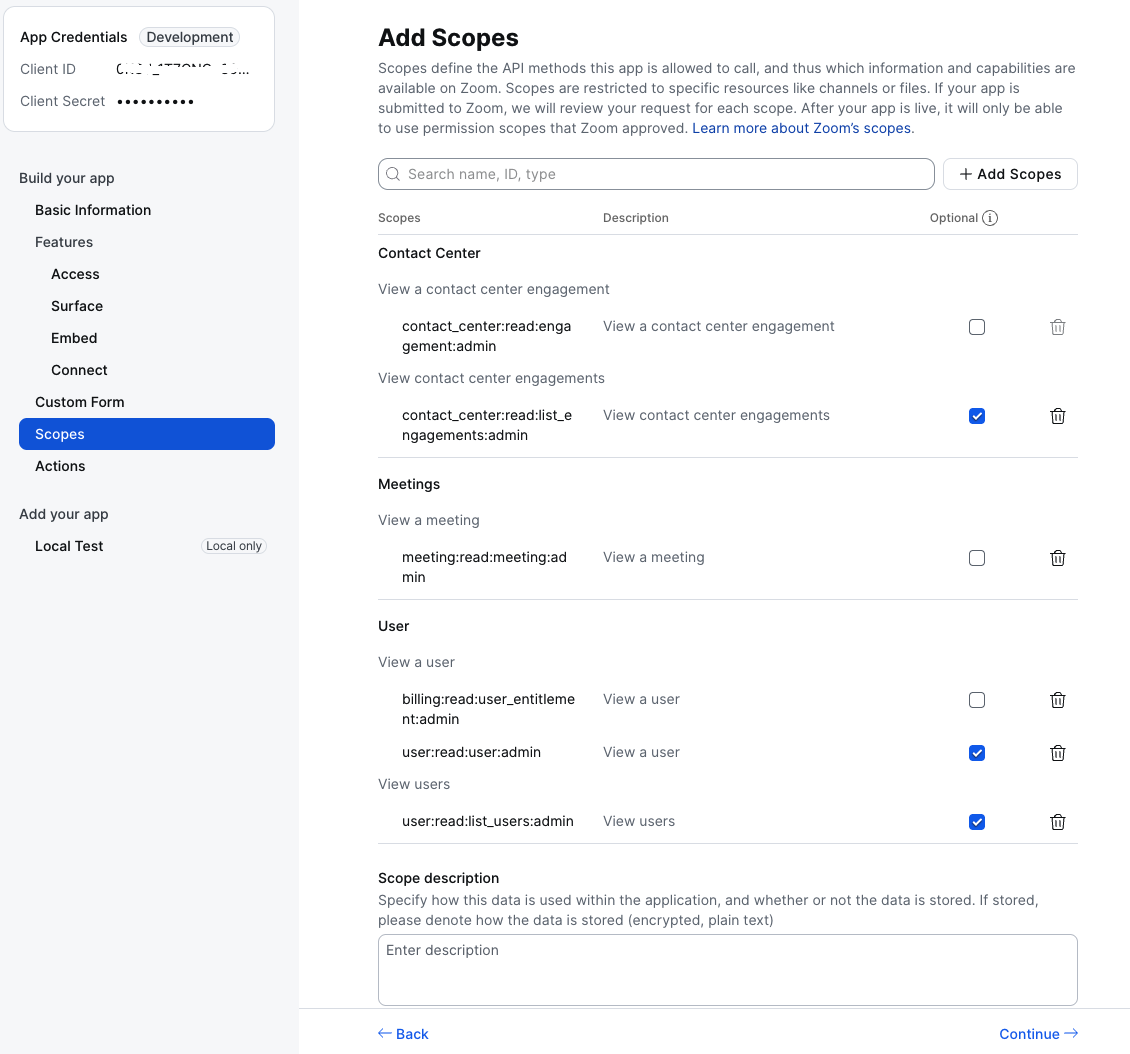
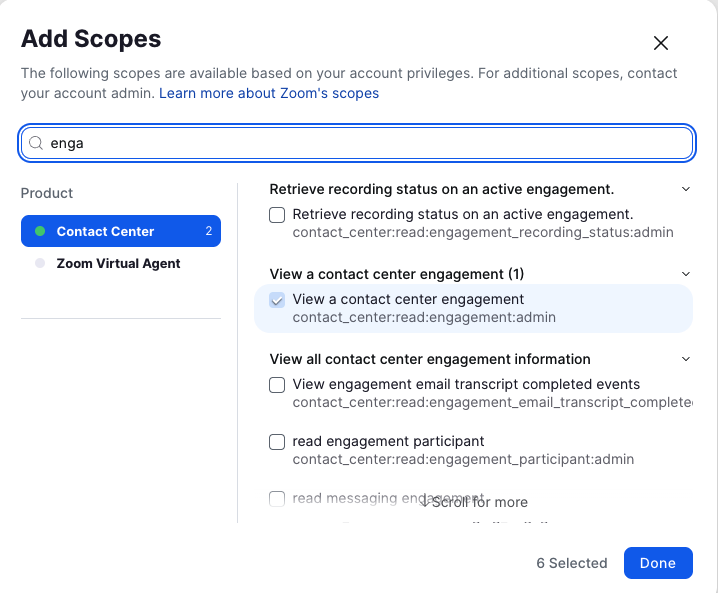
Click Continue → to proceed.
| Value | Where It's Used |
|---|---|
contact_center:read:engagement:admin |
Zoom Integration → Scopes field in OpenMethods |
Part 2 — Add Zoom Integration
Now that the Zoom app is created, configure the integration within the OpenMethods Experience Platform.
Create the Zoom Integration
- Navigate to Integrations and select Zoom Integration.
- Open the Zoom OAuth Provider.
- Enter an Integration Name.
- Provide the Client ID and Client Secret obtained from the Zoom app in Step 2.
-
Enter the required Scopes (copied from Step 6), for example:
contact_center:read:engagement:admin. - Click Submit.
Authorize the Zoom Integration
- A Zoom Authorization popup will appear.
- Sign in to Zoom. If you are already logged in, the login screen may be skipped.
- Review and select the required permissions.
- Click Allow.
- After successful authorization, the Account Linked page will be displayed.
- The integration will now show an Authorized status.
Once the integration shows "Authorized", it is ready to be selected in the OpenConnect configuration.
Part 3 — Configure OpenConnect Webhook
With the integration authorized, configure the webhook receiver in OpenConnect.
- Open Security → OpenConnect in the Experience Designer.
- Select the Zoom Contact Center tab.
- Enter the Zoom Secret Token obtained in Step 3.
- Choose the appropriate Zoom Integration from the dropdown list.
- Click Confirm configuration.
If you need to update the Secret Token or change the integration, edit the fields and click Save changes. The button label updates automatically when changes are detected.
Step 7 — Validate the Webhook
The Zoom app was created in Development mode, which is sufficient for our use case. You do not need to publish it to Production. However, to validate the webhook URL you must temporarily switch to the Production environment in Zoom.
- In the Zoom Marketplace app settings, click Production.
- Select Access.
- Click the Edit button next to your event subscription (e.g. "Engagement Answer") under Event Subscription.
- Enter the webhook URL, then click Validate.
If the URL is valid and everything is configured correctly in OpenConnect, the validation will succeed with a green confirmation.
If validation fails, verify that: (1) the webhook URL matches your environment, (2) the OpenConnect
configuration for Zoom is saved, (3) the Secret Token matches the one in your Zoom app, and (4) the
x-om-token header value matches your Customer ID.
How to Use the Integration
After setup is complete, Zoom Contact Center sends the subscribed engagement events to your OpenMethods webhook. OpenConnect uses the saved Zoom Secret Token and selected Zoom Integration to validate the configuration and route those events into the workflows you have configured.
- Keep the Zoom app authorized so the OAuth connection remains available for the integration.
- Keep the event subscription enabled in Zoom so engagement events continue to be delivered to your OpenConnect webhook URL.
- Maintain the OpenConnect configuration by updating the saved Secret Token or Zoom Integration whenever your Zoom credentials, environment, or app settings change.
- Publish and monitor the target workflows in OpenMethods so incoming Zoom events trigger the expected automation.
Once configured, the integration runs in the background. Admins usually return to this setup only when rotating credentials, changing environments, troubleshooting delivery, or removing the integration.
Manage or Update Existing Zoom Apps
To review or update your Zoom app configuration at any time:
- Go to the Zoom Marketplace.
- Click the Manage link at the top-right corner of the page.
- A list of your created apps will be displayed.
- Select the app name to view or update its configuration.
If you change the webhook URL, Secret Token, scopes, or the app used for this integration, update both Zoom and OpenMethods during the same maintenance window to avoid missed or invalid webhook deliveries.
Removing the App
To fully retire the Zoom Contact Center integration, remove it from both OpenMethods and Zoom. Completing only one side can leave an inactive configuration or an unused Zoom app behind.
- Disconnect the OpenConnect configuration in Security → OpenConnect → Zoom Contact Center. Click Disconnect and confirm the prompt. This removes the saved OpenConnect webhook configuration for Zoom from the OpenMethods Experience Platform.
- Review any related Zoom Integration connection in OpenMethods. If your team no longer needs the OAuth connection that was created for this app, remove or retire it using your normal administrator process in the Integrations area.
- Remove or deactivate the Zoom app in Zoom Marketplace. Open Manage in Zoom Marketplace and locate the General App you created for OpenMethods. If the app is dedicated to OpenMethods, delete it. If the app is shared with another internal use case, remove the OpenMethods event subscription and stop using the OpenMethods authorization before repurposing the app.
Potential impact of removal
- New Zoom webhook events will no longer be processed through the removed OpenConnect configuration.
- If Zoom still has the webhook subscription enabled after you disconnect OpenMethods, Zoom may continue attempting to send events until you also remove or disable the app configuration in Zoom.
- Removing the app stops future event delivery, but it does not automatically roll back workflow runs or other records that were created before the removal.
How Your Data Is Handled After Removal
Removing the Zoom Contact Center app stops future event delivery, but it does not automatically erase data that was already created before the integration was removed.
- The saved OpenConnect webhook configuration is removed when you confirm the disconnect action in the Zoom Contact Center OpenConnect tab.
- After that configuration is removed, new webhook deliveries are no longer processed by OpenMethods for the deleted Zoom connection.
- Data already written to OpenMethods or downstream systems remains subject to those systems' normal retention and deletion controls.
Disconnecting OpenConnect does not delete the Zoom Marketplace app definition from your Zoom account. Remove or delete the app in Zoom separately if you want to fully retire it.
Troubleshooting
Webhook Events Not Arriving
-
Verify the webhook URL in Zoom matches your environment:
https://connect.openmethodscloud.com/webhook/zoom - Confirm the
x-om-tokenheader value is set to your correct Customer ID - Ensure the Zoom app's event subscriptions are enabled and saved
- Check that the OpenConnect Zoom configuration has been confirmed
OAuth Authorization Fails
-
Verify the redirect URL is exactly:
https://integrations.openmethodscloud.com/oauth/callback - Ensure Strict Mode is enabled
- Confirm the Client ID and Client Secret match what Zoom displays
- Check that the required scopes are configured in both the Zoom app and the integration
Secret Token Appears Masked
- When editing an existing OpenConnect configuration, the Secret Token is masked for security. The Show/Hide toggle reveals the masked placeholder, not the actual stored token.
- To update the token, clear the field and paste a new Secret Token from your Zoom app settings.
Configuration Summary
Quick reference of all values needed during setup:
| Value | Source | Destination |
|---|---|---|
| Client ID | Zoom App → Basic Information | Integrations → Zoom → Client ID |
| Client Secret | Zoom App → Basic Information | Integrations → Zoom → Client Secret |
| Secret Token | Zoom App → Feature → Access | OpenConnect → Zoom → Secret Token |
| Scope | Zoom App → Scopes | Integrations → Zoom → Scopes |
| OAuth Redirect URL | https://integrations.openmethodscloud.com/oauth/callback |
Zoom App → OAuth → Redirect URL |
| Webhook URL | https://connect.openmethodscloud.com/webhook/zoom |
Zoom App → Event Subscription → Endpoint URL |
| Custom Header Key | x-om-token |
Zoom App → Event Subscription → Auth Header |
| Custom Header Value | Your Customer ID | Zoom App → Event Subscription → Auth Header |